vExpert 2023 – Subprogram Nominations

VMware annually grants the vExpert award to individuals who have made a special contribution to the VMware community. This can be either through publications, presentations, blogs, or work in the VMware User Group (VMUG). I am pleased to be part of the vExpert community for the seventh year in a row in 2023.
In addition to the common vExpert, there are subprograms for specialized application branches.

I applied for the three sub-programs vExpertPro, Application-Modernization and Multi-Cloud and was accepted in all three categories.
vExpertPro

The mission of the vExpert PRO program is to create a global network of vExperts willing to find new vExperts in their local communities, support them, and mentor them on their way to becoming vExperts.

For this purpose, vExpertPro exist in many regions of the world. I have been a member of this group since 2021 myself and have been confirmed for another year.

vExpert Multi-Cloud

The multi-cloud area covers large parts of the VMware Compute portfolio. The term cloud includes not only the public cloud, but also local data centers (private cloud) and combinations of both approaches (hybrid cloud). This includes numerous products such as vSphere, vSAN, VMware Cloud Foundation (VCF), Aria, VMware Cloud on AWS, Site Recovery Manager (SRM) or vCloud Director (VCD).

I submitted my first application for this relatively new vExpert path in 2023 and was accepted. Many thanks to the business unit for the decision.

vExpert Application Modernization

Application Modernization is all about Tanzu and Kubernetes, as well as the ecosystem around these technologies. The background was described in great detail by Keith Lee in his article “Announcing the VMware Application Modernization vExpert Program 2023“.

Manage ESXi Coredump Files

Okay, admit it, this is not a new topic, but it cost me some time in a client project. Since this blog also acts as a swap partition of my brain, I wrote it down for future reference. It is important to follow the steps correctly so that the changes are preserved after a reboot.

Why a Coredump-File?

Modern ESXi installations starting with version 7 use a new partition layout of the boot device. Coredumps are also located there. But only when the boot medium is not a USB flash medium and not an SD card. In such cases the coredump is relocated to a VMFS datastore with at least 32GB capacity.

This is exactly the case I found in a customer environment. The system was migrated from vSphere 6.7 and therefore still had the old boot layout on a ( at that time still fully supported) SD-Card RAID1. We found a vmkdump folder with files for each host on one of the shared VMFS datastores. This (VMFS5) datastore was supposed to be decommissioned and replaced with a VMFS6 datastore. (Side note from the VCI: there is no online migration path from VMFS5 to VMFS6) 😉 So the vmkdump files had to be removed from there.

Procedure

First, we get an inventory of the coredump files.

esxcli system coredump file list

All coredump files of all ESXi hosts are listed here. Each line contains the path and the Active and Configured (true or false) states. Active means that this is the current coredump file of this host. It is important that the value for Configured also has the status ‘true’. Otherwise the setting will not survive a reboot. Only the coredump file of the current host has the status ‘active’. All other files belong to other hosts and are therefore active=false.

By default, the host chooses the first matching VMFS datastore. This is not necessarily the desired one.

Remove the current Coredump-File

First we delete the active coredump file of the host. We have to force the removal because it is set as active=true.

esxcli system coredump file remove --force

If we execute the list command from above again, there should be one line less.

Add a new Coredump File

The next command creates a new coredump file at the destination. If it does not already exist, a vmkdump folder is created and the dumpfile is created in it. We specify the desired file name without extension, because it will be created automatically (.dumpfile).

esxcli system coredump file add -d <Name | UUID> -f <filename>

Example: Name of the host is “ESX-01” and the VMFS datastore has the name “Service”. The datastore may be specified as either DisplayName or Datastore_UUID.

esxcli system coredump file add -d Service -f ESX-01

A folder vmkdump will be created on the designated datastore and a file named ESX-01.dumpfile will be created in it. We can check this using the list command.

esxcli system coredump file list

A new line will appear with the full path to the new dumpfile. However, the status is still active=false and configured=false. It might be useful to copy this full path to the clipboard, because it is required in the next step.

Activate Dumpfile

In the following step, we set the created dumpfile to active. This way, the setting is retained even after a host reboot. We specify the complete path to the dumpfile. The copy from the clipboard is helpful here and avoids typos.

esxcli system coredump file set -p <path_to_dumpfile>

Example:

esxcli system coredump file set -p /vmfs/volumes/<UUID>/vmkdump/ESX-01.dumpfile

A final List command validates the result.

Links

SD- and USB-Bootmedia changes with vSphere.Next

With vSphere 7 Update 3 came bad news for all users who use USB flash media or SD cards as ESXi boot device. I have described the changes in the partitioning of the boot device in the article “ESXi Bootmedia – New features in v7 und legacy issues from the past v6.x“.

The discontinuation of support for SD cards and USB boot media put many customers in the uncomfortable position of having to replace their boot media on existing servers. VMware has responded by resuming support for SD cards and USB media under certain criteria.

The problem with these media remains. The wear of these storages was worked around by swapping out write-intensive areas. Since update 7.0 U3c, the setup detects an installation on SD/USB devices and tries to swap critical areas of the OSData partition to more stable media. This for instance includes VM-Tools and Scratch. Starting with the upcoming vSphere.Next release, the entire OSData partition will be swapped out to more robust data storage. However, the question arises here why, when resilient storage media is available, it is not used completely as a boot device right away.

VMware has published details about the changed strategy concerning boot media in KB 85685.

vCenter Server 7.0 Update 3e released

VMware has released a patch update 3e for vCenter. This is a maintenance release and primarily adds updates for vSphere with Tanzu. There are also separate release notes for vSphere with Tanzu.

What’s New?

  • Added Network Security Policy support for VMs deployed via VM operator service – Security Policies on NSX-T can be created via Security Groups based on Tags. It is now possible to create NSX-T based security policy and apply it to VMs deployed through VM operator based on NSX-T tags.
  • Supervisor Clusters Support Kubernetes 1.22 – This release adds the support of Kubernetes 1.22 and drops the support for Kubernetes 1.19. The supported versions of Kubernetes in this release are 1.22, 1.21, and 1.20. Supervisor Clusters running on Kubernetes version 1.19 will be auto-upgraded to version 1.20 to ensure that all your Supervisor Clusters are running on the supported versions of Kubernetes.

Check before update

If you upgraded vCenter Server from a version prior to 7.0 Update 3c and your Supervisor Cluster is on Kubernetes 1.9.x, the tkg-controller-manager pods go into a CrashLoopBackOff state, rendering the guest clusters unmanageable

Read KB 88443 for a workaround.

Test K8s Version

Make sure you’re on a supported K8s version.

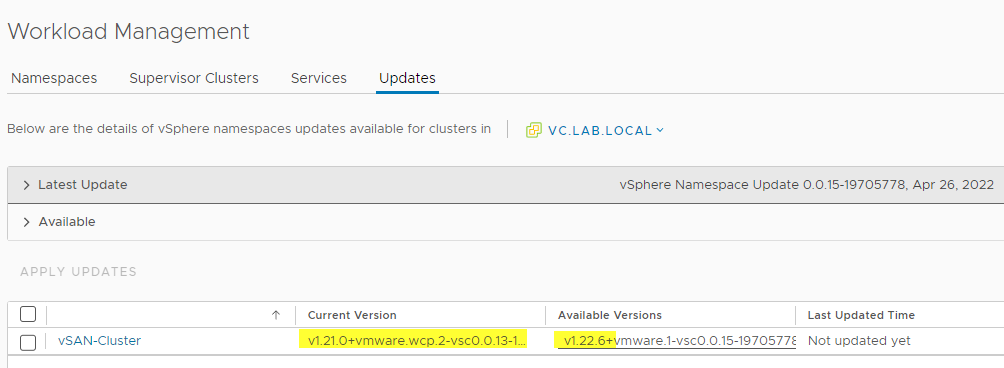
Menu > Workload Management > Subervisor Clusters

The image above indicates we’re already on version 1.21, which is good for an update.

Update

Before updating your VCSA make sure you have a configuration backup! An optional VM snapshot is a good idea too. It might help to revert settings fast in case something goes wrong.

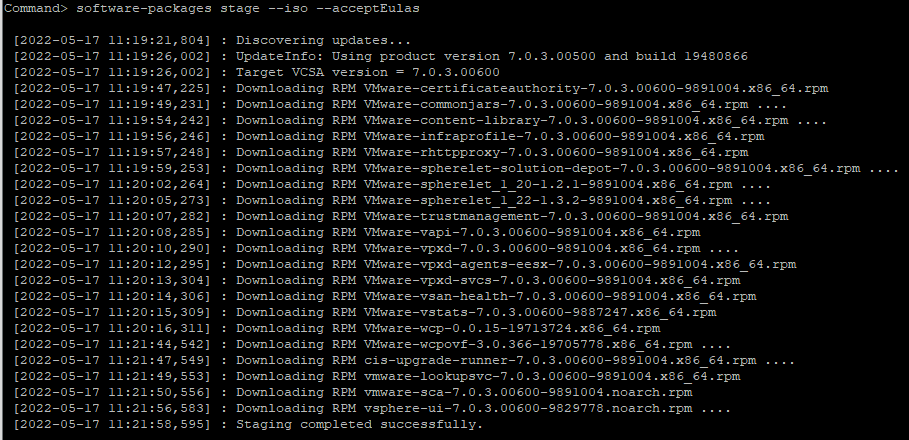
You can either apply the update from VAMI or from the shell. The image below shows an overview of the new packages with this update.

After the update is installed you will have an option to deploy a new Kubernetes version in your Supervisor Control Plane.