vCenter Appliance Migration Upgrade

Relink VM MoRef IDs to Veeam Backup Restore-Points

In this post I will show how to use Veeam Migration Utility in cases when you have to migrate a whole cluster to a new vCenter, but you can’t afford to cut existing backup chains.

The Good

Upgrading a vCenter Server Appliance (VCSA) has become a commodity in recent times. All you have to do is to run an upgrade wizard and point to the old VCSA. Thanks to VMware developers it’s one of these “Next-Next-Finish” deployments. At the end you’ll have an upgraded vCenter with same settings, name, IP, and (if you like) historic data.  This is great! I can remember vCenter on Windows upgrades that were a PITA.

The Bad

In some rare (but ugly) occasions you simply can’t use the wizard and you have to migrate your hosts to a completely new VCSA without data migration. You’ll have to rebuild every setting, datacenter, cluster, folder, pool, group, rule, etc from scratch to match your old environment. Continue reading “vCenter Appliance Migration Upgrade”

vCenter issues alarm esx.problem.hyperthreading.unmitigated

After installing VMware patches you might see a warning:

XXX esx.problem.hyperthreading.unmitigated.formatonhost not found XXX

Those patches which are addressed in VMware Security Advisory VMSA-2018-0020 migitate a vulnerability named L1TF. Because the patch will result in a performance impact, it is not activated by default. Administrators need to decide what is their main focus: performance or security.

Suppress warning

If one decides to have more performance and neglects the potential threat, then it is possible to suppress the warning. Just set advanced option UserVars.SuppressHyperthreadWarning from 0 to 1 and the warning will disappear. This should only be done after reviewing KB 55806.

Activate migitation

Connect to the vCenter Server using either the vSphere Web or vSphere Client. Switch to “Hosts and Clusters” view and select an ESXi host in your inventory.
Select an ESXi host in the inventory.


Click the Manage (5.5/6.0) or Configure (6.5/6.7) tab and then switch to “Settings”.
Move to System > Advanced System Settings and enter in the filterbox: VMkernel.Boot.hyperthreadingMitigation.

Select the setting and click the Edit pencil icon. Change the default value (false) to true and click OK.

In order to take effect, the host needs to reboot.

PowerCLI

Using PowerCLI is recommended if you have more than one host.

Connect-VIServer vc.mydomain.com

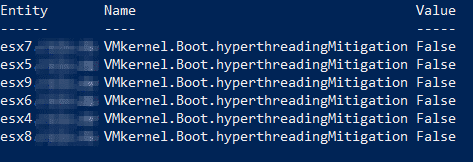
Check current values.

Get-VMHost | Get-AdvancedSetting -Name VMkernel.Boot.hyperthreadingMitigation | Select Entity, Name, Value

Set values

The next command will activate the migitation on all hosts without confirmation (be careful!).

Get-VMHost | Get-AdvancedSetting -Name VMkernel.Boot.hyperthreadingMitigation | Set-AdvancedSetting -Value 1 -Confirm:$false

In order to take effect, the host needs to reboot.

Links

VMware KB 57374 – L1TF related “esx.problem.hyperthreading.unmitigated” vCenter Server Updates

VMware KB 55806 – L1 Terminal Fault – VMM