Retrofitting existing vSphere clusters with a TPM chip

The growing threats in the IT sector and the increasing demands on system security have led many companies to rethink their existing infrastructure. For customers operating older VMware vSphere clusters, retrofitting with TPM 2.0 chips offers an effective way of modernizing the security architecture. TPM 2.0 provides the basis for improved system trustworthiness by securely storing cryptographic keys and detecting system tampering at an early stage.

What is TPM?

The Trusted Platform Module (TPM) is a hardware-based security chip that is installed in computers and other devices. It is used to securely store cryptographic keys, for authentication and to protect sensitive data. TPM supports security functions such as device encryption, secure booting and system integrity checks.

Why TPM

In my role as a data center architect and senior consultant, I come across a variety of different customer environments. On the one hand, many of these environments are brand new and state of the art, but there are also numerous older clusters that have been in operation for five or more years. This does not necessarily have to be a disadvantage, as these older clusters are often very well tailored to the specific requirements of the respective customers. They have no performance bottlenecks and hardware support is guaranteed. Against this background, the question arises as to whether an investment in new hardware is actually necessary.

A key advantage of modern hardware security modules is the integration of Secure Boot, a technology that ensures that only signed and trusted software is loaded at system startup. This significantly reduces the risk of malware or unauthorized boot loaders interfering with the boot process. This not only enables companies to better ward off attacks at firmware level, but also to ensure that all subsequent software components come from a secure and verified source.

In this blog post, I explain why retrofitting with TPM 2.0 in older VMware vSphere environments is an important step – and how the combination with Secure Boot makes an essential contribution to protecting modern IT infrastructures.

We will see what steps need to be taken to retrofit existing systems with TPM chips without reinstalling the ESXi host.

Continue reading “Retrofitting existing vSphere clusters with a TPM chip”

ESXi Config-Backup with PowerCLI requires HTTP

There is a really useful and convenient PowerCLI one-liner for backing up the host configuration. I have been using it for years and had also explained this in detail in an old blogpost.

Get-Cluster -Name myCluster | Get-VMHost | Get-VMHostFirmware -BackupConfiguration -DestinationPath 'C:\myPath'

This is a command I always teach my students as part of my VMware courses. Backing up the host configuration is downright mandatory before making changes to the host, installing patches and drivers, or host updates. Just a few seconds of additional effort, but these configuration backups have saved me more than once from major trouble and many hours of extra work.

Recently, I was backing up host configurations in a major datacenter. Surprisingly, the command did not work on some of the vCenter instances and aborted with an error message.

Get-VMHostFirmware : 18.08.2023 12:05:49 Get-VMHostFirmware An error occurred while sending the request.
At line:1 char:28
+… et-VMHost | Get-VMHostFirmware -BackupConfiguration -DestinationPath …
+ ~~~~~~~~~~~~~~~~~~~~~~~~~~~~~~~~~~~~~~~~~~~~~~~~~~~~~~~~~
+ CategoryInfo : NotSpecified: (:) [Get-VMHostFirmware], ViError
+ FullyQualifiedErrorId : Client20_SystemManagementServiceImpl_BackupVmHostFirmware_DownloadError,VMware.VimAutomation.ViCore.Cmdlets.Commands.Host.GetVMHostFirmware

To understand the error, we must first understand how the PowerCLI command works. First, a backup of the host configuration is triggered on the host via vCenter. The host stores this locally as a zipped TAR archive (.tgz). The name is configBundle-HostFQDN.tgz (example: configBundle-esx01.lab.local.tgz). The archive is then downloaded from the host in a second step. The URL for this is:

http://[HostFQDN]/downloads/[Host-UUID]/configBundle-HostFQDN.tgz

By reading the error message above, there was obviously a problem with the download of the TGZ file. With the help of the network admins, it quickly became obvious what had happened. My workstation, from which I sent the PowerCLI command, tried unsuccessfully to establish an HTTP connection to the ESXi host. But this was blocked by a firewall rule.

I was wondering why the transfer is handled using unencrypted HTTP. In the log of the firewall you can see a connection attempt to the ESXi host with HTTP and HTTPS.

Is there a way to force the download using HTTPS?

My first thought was that there might be a parameter to the command that enforces the HTTPS protocol. A query in the VMTN forum unfortunately brought some disillusionment.

It is a bit surprising that VMware uses an unencrypted protocol for this sensitive data. All the more since the PowerCLI session to vCenter already runs over HTTPS anyway. The most plausible explanation would be that it was simply ‘forgotten’ to secure the transfer via SSL with this quite old command.

So currently there is no other choice but creating a firewall rule that allows downloading via HTTP.

Monitor Tanzu K8s Compliance with Runecast Analyzer

Checking the cluster’s compliance for security or hidden problems is meanwhile a standard task. There are automated tools to do the job such as VMware Skyline or Runecast Analyzer. In addition to standard vSphere clusters, the latter can also check vSAN, NSX-T, AWS, Kubernetes and, since version 5.0, Azure for compliance.

In this blog post I’d like to outline how to connect a vSphere with Tanzu [*] environment to Runcast Analyzer. [* native Kubernetes Pods and TKG on vSphere]

Some steps are simplified because it is a Lab environment. I will point this out at the given point.

Before we can register Tanzu in Runecast Analyzer, we need some information.

  • IP address or FQDN of the SupervisorControlPlane
  • Service account with access to the SupervisorControlPlane
  • Service account access token
Continue reading “Monitor Tanzu K8s Compliance with Runecast Analyzer”

Activate Immutability flag on existing Veeam XFS Repositories

Veeam Backup & Replication v11 is about to be launched on February 24th. Partners and service providers already have access to the RTM build.

One of my favourite features of version 11 are immutable backup files. You can read about it in my recent post “Hardening your Veeam Backup strategy with immutable repositories on Linux XFS“.

Some of you might already use Linux repository servers based on XFS with fast clone. Once you upgrade to Veeam Backup & Replication version 11 you may wish to activate immutable backups. I will explain in this blog post how you can use this new feature on existing XFS repository servers.

Activate immutability

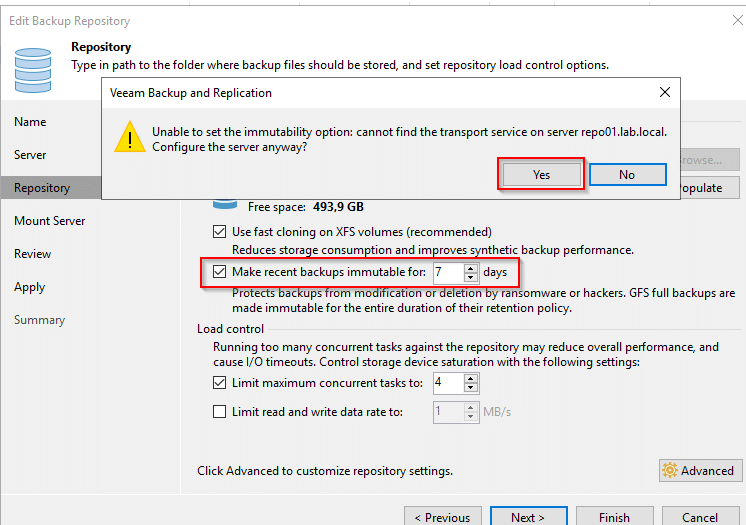
To activate the immutability feature edit your existing backup repository servers and go to step “repository” (picture below). Starting with version 11 there’s a checkbox “make recent backups immutable for [x] days” where 7 is the minimum value to enter. Once you activate the checkbox you will most likely see a message “Unable to set the immutability option: cannot find the transport service on server <your repo server>. Configure the server anyway?“. Click on [Yes].

To make use of the immutability flag you’ll have to reconfigure the transport service on the Linux server.

Continue reading “Activate Immutability flag on existing Veeam XFS Repositories”