Set password policy for VMware Linux appliances

The point of changing passwords regularly is debatable. I think that forcing users to assign a new password every x days, which must be very different from the previous one, is counterproductive. But that’s another topic.

The scenario I want to talk about looks like this: a non-production lab environment where the password always expires when you have more important things to do. Appliance xy gives me the virtual middle finger and forces me to enter a new password, which must contain at least 5 special Klingon characters. Grrr! This is a non-productive lab and I use the same password for all – yes, all – services and logins. It’s about feasibility – not security.

Before anyone gets me wrong: 
Yes, in production that would be a very stupid idea.

Password Expiration

The first step is to set the password expiry time to zero (caution! not for VCF!) or a very long period of time. By default, I set 9000 days here. That’s the equivalent of about 24 years and 7 months. That should be enough πŸ˜‰

Often this value cannot be configured in the GUI. Then the CLI is required. In most Linux variants, the setting is hidden in a configuration file called login.defs. We can make a quick query on the shell.

cat /etc/login.defs | grep PASS

PASS_MAX_DAYS 90
PASS_MIN_DAYS 0
PASS_MIN_LEN 8
PASS_WARN_AGE 7

Voila! PASS_MAX_DAYS is our password expiration time.

We have to use vi in order to make changes, as other editors are rarely available in these systems. But don’t be scared of vi. It’s actually quite nice. πŸ™‚ We open the configuration file with:

vi /etc/login.defs

Now keep calm and just press the i key (for insert). Now look for the line with PASS_MAX_DAYS and change the value to 9000, for example. If you wish, you can also set the minimum age PASS_MIN_DAYS to 0. This allows the password to be changed again without waiting.

To save our changes, press the ESC key and then the key with the colon. A colon appears at the bottom left, indicating that we are in command mode. We enter the characters wq (write, quit) and press Enter.

Special case NSX-T with VCF

The expiry time of the predefined accounts admin, root and audit under NSX-T are set on the shell of the NSX manager with a separate command. To do this, you connect to the virtual IP (VIP) of the management cluster via SSH and you’ll be forwarded to the current master node.

To set the expiry time of the three accounts to 9000 days, enter the following three commands:

set user admin password-expiration 9000
set user root password-expiration 9000
set user audit password-expiration 9000

In NSX-T environments without VCF, the password expiry times may be completely deactivated.

Attention! With NSX-T in conjunction with VCF, however, this leads to problems during the upgrade. For the sake of completeness, here are the commands for deactivation:

clear user admin password-expiration
clear user root password-expiration
clear user audit password-expiration

Control

The expiry time in NSX-T can be queried with these commands:

get user admin password-expiration
get user root password-expiration
get user audit password-expiration

Password History

Normally the above changes are sufficient. However, if we have missed the expiration date and had to set a new password when logging in, we cannot switch back to our old password. The system remembers a defined number of recent passwords and does not allow recycling. But we can change this too. In many Linux variants, there is a daemon for pluggable authentication modules (pam.d). The configuration is located under /etc/pam.d/common-password. Systems with root access can also have the configuration in /etc/pam.d/system-password instead.

vi /etc/pam.d/system-password

Here I set the value remember=0. This allows the desired password to be reset immediately. As root user, the command on the shell is sufficient:

passwd

Heads-up: Linux Start- and Reboot-Issues with Maxtang NX6412 solved

Cohesity vExpert gift

I recently became the owner of a Maxtang NX6412-B11 Mini PC. Cohesity gave away these barebones to vExperts at the VMware Explore EMEA in Barcelona. Once again a big thank you to Cohesity for their support of the community!

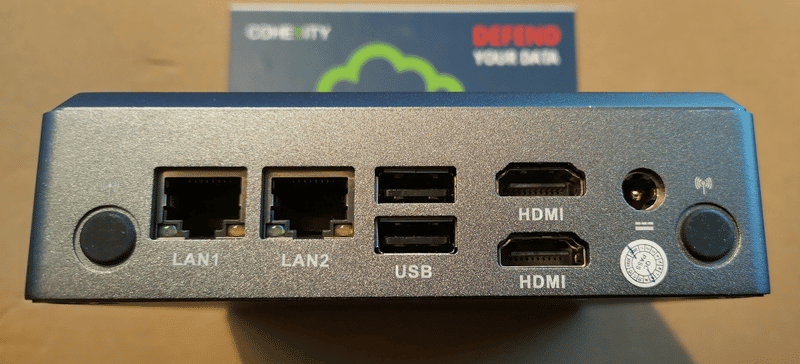
The fanless MiniPC with Elkhart Lake chipset is well-equipped. It has 2x 1 Gbit LAN, 1x USB-C (front), 2x USB 3.2 (front), 2x USB 2.0, 2x HDMI 2.0, and an audio jack.

Featured ports on the rear side.

The MiniPC will be a great addition to my homelab. I had intended to install the Tanzu community edition for it. Unfortunately, the project has since been discontinued by VMware and the removal of the packages from GitHub has been announced. πŸ™

Hardware finish

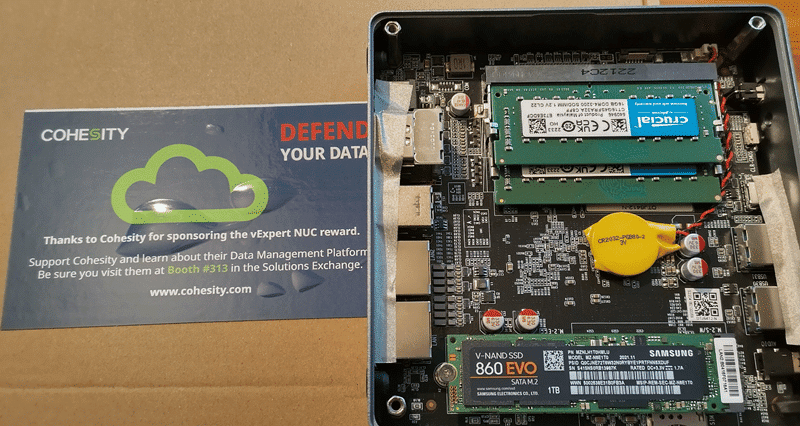
The barebone still had to be provided with RAM and a flash disk. I installed a Samsung SSD 860 EVO Series 1TB M.2 SATA and two SO-DIMM DDR4 3200 16 GB from Crucial.

Reboot Issues with Linux

With the SATA SSD and the RAM, the machine was ready to boot. Ubuntu 22.04 LTS was used as operating system. After installation, a usual reboot was requested. However, the PC did not shut down completely and remained in the “Reached target shutdown” state. The PC had to be powered off hard. The reboot also took several minutes, which is very unusual for Ubuntu. To rule out the possibility that the problem is specific to Ubuntu, I tried an installation with Fedora. The result was exactly the same here too.

The solution

After a lengthy search, I found a clue that was specific to the EHL hardware platform. The fix is to disable a kernel module for the Intel Elkhart Lake SoC chipset. This can be done by adding it to the blacklist.conf file.

sudo vi /etc/modprobe.d/blacklist.conf

The line below must be added to blacklist.conf:

blacklist pinctrl_elkhartlake

Quit the vi editor with [ESC] [:] wq! (save and exit)

update-initramfs –u

The next shutdown was still delayed, but after a cold boot the OS came up within a few seconds.

I hope this hint helps someone – especially my vExpert colleagues who received the Cohesity gift too. Sharing is caring. πŸ™‚

Running Tanzu Community Edition on a Linux VM – Simple Walkthrough for Beginners

You don’t need an enterprise cluster in order to get an impression of VMware Tanzu and Kubernetes. Thanks to the Tanzu Community Edition (TCE), now anyone can try it out for themselves – for free. The functionality offered is not limited in comparison to commercial Tanzu versions. The only thing you don’t get with TCE is professional support from VMware. Support is provided by the community via forums, Slack groups or Github. This is perfectly sufficient for a PoC cluster or the CKA exam training.

Deployment is pretty fast and after a couple of minutes you will have a functional Tanzu cluster.

TCE Architecture

The TCE can be deployed in two variants either as a standalone cluster or as a managed cluster.

Standalone Cluster

A fast and resource-efficient way of deployment without a management cluster. Ideal for small tests and demos. The standalone cluster offers no lifecycle management. Instead, it has a small footprint and can also be used on small environments.

Source: VMware

Managed Cluster

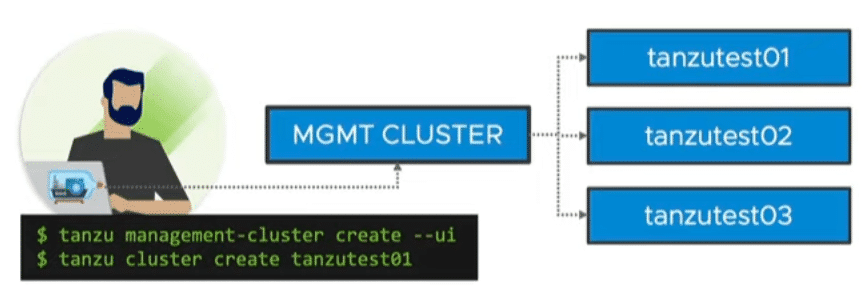
Like commercial Tanzu versions, there is a management cluster and 1 to n workload clusters. It comes with lifecycle management and cluster API. Thus, declarative configuration files can be used to define your Kubernetes cluster. For example, the number of nodes in the management cluster, the number of worker nodes, the version of the Ubuntu image or the Kubernetes version. Cluster API ensures compliance with the declaration. For example, if a worker node fails, it will be replaced automatically.

By using multiple nodes, the managed cluster of course also requires considerably more resources.

Source: VMware

Deployment options

TCE can be deployed either locally on a workstation by using Docker, in your own lab/datacenter on vSphere, or in the cloud on Azure or aws.

I have a licensed Tanzu with vSAN and NSX-T integration up and running in my lab. So TCE on vSphere would not really make sense here. Cloud resources on aws or Azure are expensive. Therefore, I would like to describe the smallest possible and most economical deployment of a standalone cluster using Docker. To do so, I will use a VM on VMware workstation. Alternatively, a VMware player or any other kind of hypervisor can be used.

Continue reading “Running Tanzu Community Edition on a Linux VM – Simple Walkthrough for Beginners”

Activate Immutability flag on existing Veeam XFS Repositories

Veeam Backup & Replication v11 is about to be launched on February 24th. Partners and service providers already have access to the RTM build.

One of my favourite features of version 11 are immutable backup files. You can read about it in my recent post “Hardening your Veeam Backup strategy with immutable repositories on Linux XFS“.

Some of you might already use Linux repository servers based on XFS with fast clone. Once you upgrade to Veeam Backup & Replication version 11 you may wish to activate immutable backups. I will explain in this blog post how you can use this new feature on existing XFS repository servers.

Activate immutability

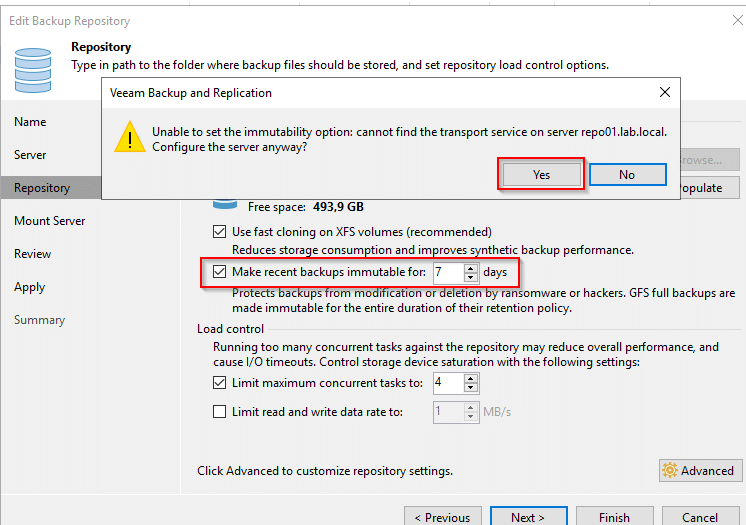
To activate the immutability feature edit your existing backup repository servers and go to step “repository” (picture below). Starting with version 11 there’s a checkbox “make recent backups immutable for [x] days” where 7 is the minimum value to enter. Once you activate the checkbox you will most likely see a message “Unable to set the immutability option: cannot find the transport service on server <your repo server>. Configure the server anyway?“. Click on [Yes].

To make use of the immutability flag you’ll have to reconfigure the transport service on the Linux server.

Continue reading “Activate Immutability flag on existing Veeam XFS Repositories”