ESXi Config-Backup with PowerCLI requires HTTP

There is a really useful and convenient PowerCLI one-liner for backing up the host configuration. I have been using it for years and had also explained this in detail in an old blogpost.

Get-Cluster -Name myCluster | Get-VMHost | Get-VMHostFirmware -BackupConfiguration -DestinationPath 'C:\myPath'

This is a command I always teach my students as part of my VMware courses. Backing up the host configuration is downright mandatory before making changes to the host, installing patches and drivers, or host updates. Just a few seconds of additional effort, but these configuration backups have saved me more than once from major trouble and many hours of extra work.

Recently, I was backing up host configurations in a major datacenter. Surprisingly, the command did not work on some of the vCenter instances and aborted with an error message.

Get-VMHostFirmware : 18.08.2023 12:05:49 Get-VMHostFirmware An error occurred while sending the request.
At line:1 char:28
+… et-VMHost | Get-VMHostFirmware -BackupConfiguration -DestinationPath …
+ ~~~~~~~~~~~~~~~~~~~~~~~~~~~~~~~~~~~~~~~~~~~~~~~~~~~~~~~~~
+ CategoryInfo : NotSpecified: (:) [Get-VMHostFirmware], ViError
+ FullyQualifiedErrorId : Client20_SystemManagementServiceImpl_BackupVmHostFirmware_DownloadError,VMware.VimAutomation.ViCore.Cmdlets.Commands.Host.GetVMHostFirmware

To understand the error, we must first understand how the PowerCLI command works. First, a backup of the host configuration is triggered on the host via vCenter. The host stores this locally as a zipped TAR archive (.tgz). The name is configBundle-HostFQDN.tgz (example: configBundle-esx01.lab.local.tgz). The archive is then downloaded from the host in a second step. The URL for this is:

http://[HostFQDN]/downloads/[Host-UUID]/configBundle-HostFQDN.tgz

By reading the error message above, there was obviously a problem with the download of the TGZ file. With the help of the network admins, it quickly became obvious what had happened. My workstation, from which I sent the PowerCLI command, tried unsuccessfully to establish an HTTP connection to the ESXi host. But this was blocked by a firewall rule.

I was wondering why the transfer is handled using unencrypted HTTP. In the log of the firewall you can see a connection attempt to the ESXi host with HTTP and HTTPS.

Is there a way to force the download using HTTPS?

My first thought was that there might be a parameter to the command that enforces the HTTPS protocol. A query in the VMTN forum unfortunately brought some disillusionment.

It is a bit surprising that VMware uses an unencrypted protocol for this sensitive data. All the more since the PowerCLI session to vCenter already runs over HTTPS anyway. The most plausible explanation would be that it was simply ‘forgotten’ to secure the transfer via SSL with this quite old command.

So currently there is no other choice but creating a firewall rule that allows downloading via HTTP.

Manage ESXi Coredump Files

Okay, admit it, this is not a new topic, but it cost me some time in a client project. Since this blog also acts as a swap partition of my brain, I wrote it down for future reference. It is important to follow the steps correctly so that the changes are preserved after a reboot.

Why a Coredump-File?

Modern ESXi installations starting with version 7 use a new partition layout of the boot device. Coredumps are also located there. But only when the boot medium is not a USB flash medium and not an SD card. In such cases the coredump is relocated to a VMFS datastore with at least 32GB capacity.

This is exactly the case I found in a customer environment. The system was migrated from vSphere 6.7 and therefore still had the old boot layout on a ( at that time still fully supported) SD-Card RAID1. We found a vmkdump folder with files for each host on one of the shared VMFS datastores. This (VMFS5) datastore was supposed to be decommissioned and replaced with a VMFS6 datastore. (Side note from the VCI: there is no online migration path from VMFS5 to VMFS6) 😉 So the vmkdump files had to be removed from there.

Procedure

First, we get an inventory of the coredump files.

esxcli system coredump file list

All coredump files of all ESXi hosts are listed here. Each line contains the path and the Active and Configured (true or false) states. Active means that this is the current coredump file of this host. It is important that the value for Configured also has the status ‘true’. Otherwise the setting will not survive a reboot. Only the coredump file of the current host has the status ‘active’. All other files belong to other hosts and are therefore active=false.

By default, the host chooses the first matching VMFS datastore. This is not necessarily the desired one.

Remove the current Coredump-File

First we delete the active coredump file of the host. We have to force the removal because it is set as active=true.

esxcli system coredump file remove --force

If we execute the list command from above again, there should be one line less.

Add a new Coredump File

The next command creates a new coredump file at the destination. If it does not already exist, a vmkdump folder is created and the dumpfile is created in it. We specify the desired file name without extension, because it will be created automatically (.dumpfile).

esxcli system coredump file add -d <Name | UUID> -f <filename>

Example: Name of the host is “ESX-01” and the VMFS datastore has the name “Service”. The datastore may be specified as either DisplayName or Datastore_UUID.

esxcli system coredump file add -d Service -f ESX-01

A folder vmkdump will be created on the designated datastore and a file named ESX-01.dumpfile will be created in it. We can check this using the list command.

esxcli system coredump file list

A new line will appear with the full path to the new dumpfile. However, the status is still active=false and configured=false. It might be useful to copy this full path to the clipboard, because it is required in the next step.

Activate Dumpfile

In the following step, we set the created dumpfile to active. This way, the setting is retained even after a host reboot. We specify the complete path to the dumpfile. The copy from the clipboard is helpful here and avoids typos.

esxcli system coredump file set -p <path_to_dumpfile>

Example:

esxcli system coredump file set -p /vmfs/volumes/<UUID>/vmkdump/ESX-01.dumpfile

A final List command validates the result.

Links

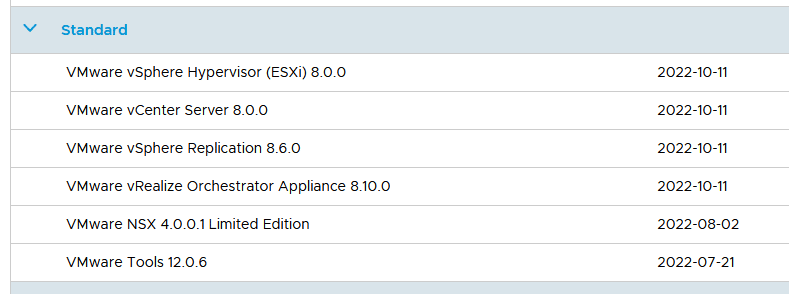
VMware vSphere 8 is GA !

Waiting is over. Fire up your download engines and get VMware vSphere8 binaries.

The wait has been rewarded. After the announcement at VMware Explore 2022 in North America, the installer files are now available on the VMware Portal (login required).

Links

SD- and USB-Bootmedia changes with vSphere.Next

With vSphere 7 Update 3 came bad news for all users who use USB flash media or SD cards as ESXi boot device. I have described the changes in the partitioning of the boot device in the article “ESXi Bootmedia – New features in v7 und legacy issues from the past v6.x“.

The discontinuation of support for SD cards and USB boot media put many customers in the uncomfortable position of having to replace their boot media on existing servers. VMware has responded by resuming support for SD cards and USB media under certain criteria.

The problem with these media remains. The wear of these storages was worked around by swapping out write-intensive areas. Since update 7.0 U3c, the setup detects an installation on SD/USB devices and tries to swap critical areas of the OSData partition to more stable media. This for instance includes VM-Tools and Scratch. Starting with the upcoming vSphere.Next release, the entire OSData partition will be swapped out to more robust data storage. However, the question arises here why, when resilient storage media is available, it is not used completely as a boot device right away.

VMware has published details about the changed strategy concerning boot media in KB 85685.