
The growing threats in the IT sector and the increasing demands on system security have led many companies to rethink their existing infrastructure. For customers operating older VMware vSphere clusters, retrofitting with TPM 2.0 chips offers an effective way of modernizing the security architecture. TPM 2.0 provides the basis for improved system trustworthiness by securely storing cryptographic keys and detecting system tampering at an early stage.
What is TPM?
The Trusted Platform Module (TPM) is a hardware-based security chip that is installed in computers and other devices. It is used to securely store cryptographic keys, for authentication and to protect sensitive data. TPM supports security functions such as device encryption, secure booting and system integrity checks.
Why TPM
In my role as a data center architect and senior consultant, I come across a variety of different customer environments. On the one hand, many of these environments are brand new and state of the art, but there are also numerous older clusters that have been in operation for five or more years. This does not necessarily have to be a disadvantage, as these older clusters are often very well tailored to the specific requirements of the respective customers. They have no performance bottlenecks and hardware support is guaranteed. Against this background, the question arises as to whether an investment in new hardware is actually necessary.
A key advantage of modern hardware security modules is the integration of Secure Boot, a technology that ensures that only signed and trusted software is loaded at system startup. This significantly reduces the risk of malware or unauthorized boot loaders interfering with the boot process. This not only enables companies to better ward off attacks at firmware level, but also to ensure that all subsequent software components come from a secure and verified source.
In this blog post, I explain why retrofitting with TPM 2.0 in older VMware vSphere environments is an important step – and how the combination with Secure Boot makes an essential contribution to protecting modern IT infrastructures.
We will see what steps need to be taken to retrofit existing systems with TPM chips without reinstalling the ESXi host.
Prerequisites
The prerequisite for using Secure Boot is to change the boot method from the conventional BIOS (legacy) method to UEFI boot. This step does not require a TPM chip in the system, but is a requirement for all further steps.
Two alternative boot methods are often displayed in the server’s boot menu: the conventional BIOS method or the UEFI method.
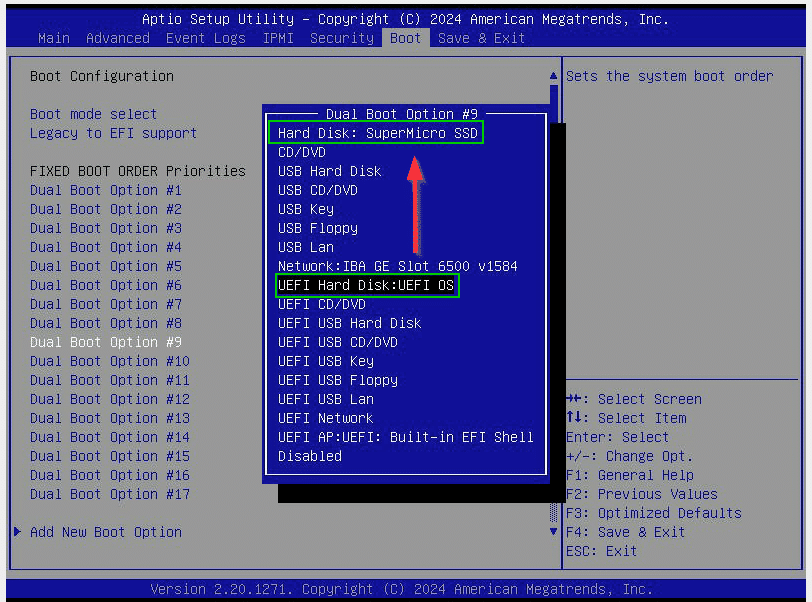
The first test is to select the UEFI boot method. If the system boots normally, the first hurdle has been overcome. We can then switch the system to UEFI only and disable compatibility mode (if available).
Retrofitting TPM
TPM was often not integrated into older systems in order to save costs. However, brand manufacturers offer TPM chips as a retrofit kit for a large number of their server models. This is rarely an issue in modern systems, as they are usually equipped with a TPM module by default.
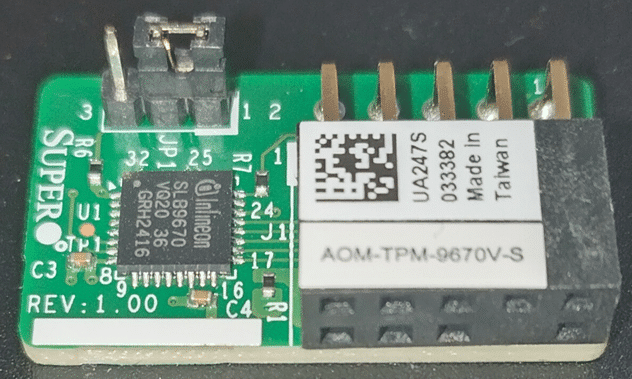
After installation, the TPM module should initially remain disabled in the BIOS, as preparatory steps must first be carried out on the host.
Secure Boot Precheck
A Python script on each ESXi performs a preliminary check to see whether Secure Boot is possible. It is started on the shell using the following command.
/usr/lib/vmware/secureboot/bin/secureBoot.py -c
Among other things, it checks whether all vSphere Installation Bundles (VIB) are digitally signed.
Secure boot can be enabled: All vib signatures verified. All tardisks validated. All acceptance levels validated
This test also does not require a TPM.

Activate TPM and Secureboot
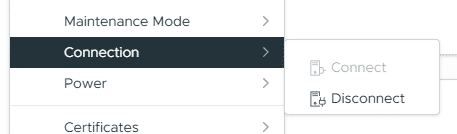
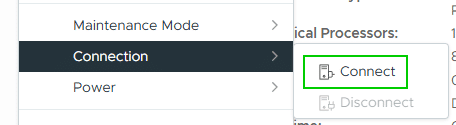
We boot the ESXi host (with the TPM chip still deactivated). In the vSphere Client, we switch to maintenance mode and disconnect the host from the cluster. This step is important because cryptographic keys are only exchanged when reconnecting to vCenter.
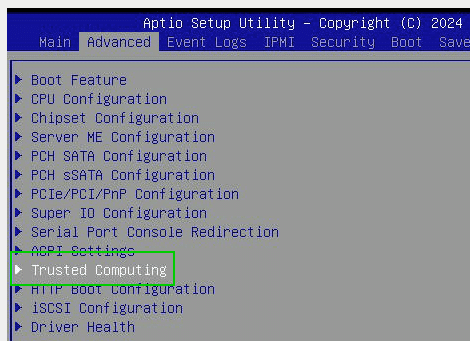
After disconnecting the host, we shut it down, restart it, go to the system setup and activate the TPM chip. In the case shown here, it is an AMIBIOS on a SuperMicro server.
Setup > Advanced > Trusted Computing > Security Device Support > Enabled
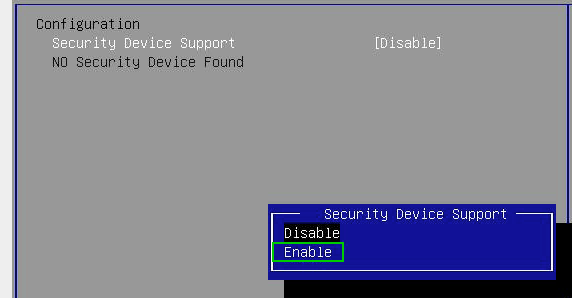
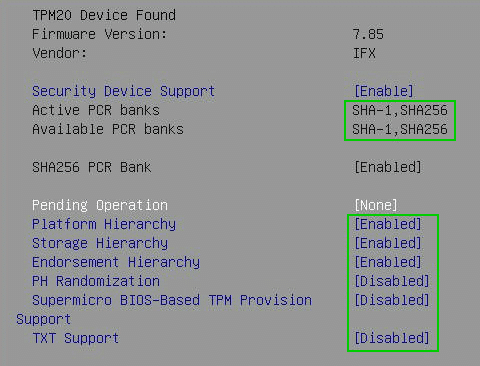
The status initially remains‘Security Device not found‘ until we have saved the settings and restarted the server. Immediately after the reset, we switch back to the system setup. We now see information about the TMP chip and can change parameters.
Factory Keys
Before we can activate Secure Boot, the initial keys must be transferred to the chip. Immediately after activating the chip, the key source is still empty (left image).
System Setup > Security > Secure boot > Key Management > Factory Key Provision > Enabled
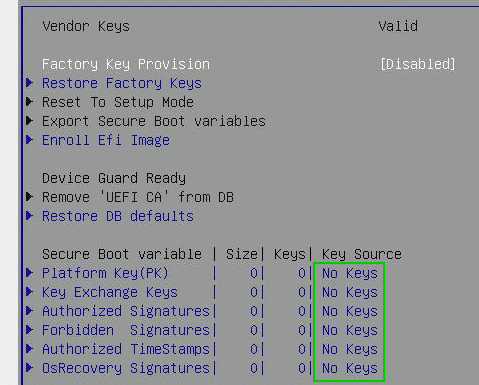
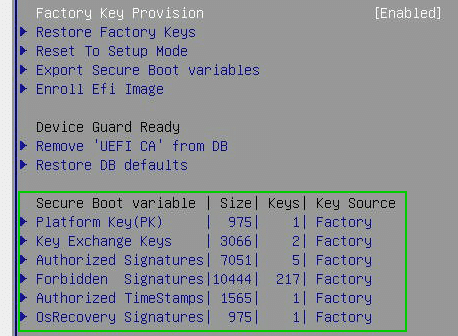
In the image on the right, we can see that the factory keys have been provided.
Before activating Secure Boot, the support of the Compatibility Support Module (CSM) must be deactivated.
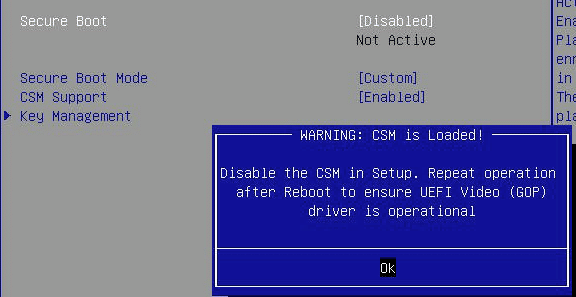
System Setup > Security >Secure boot > CSM support > Disabled
We save the settings, restart the server and boot back into the system setup. Secure Boot can then be activated in the last step.
System Setup > Security > Secure boot > Secure boot > Enabled
We save the settings again and boot the ESXi host. As soon as the ESXi is fully started, it must be reconnected to the vCenter. The keys of the TPM are read from the vCenter for the first time.
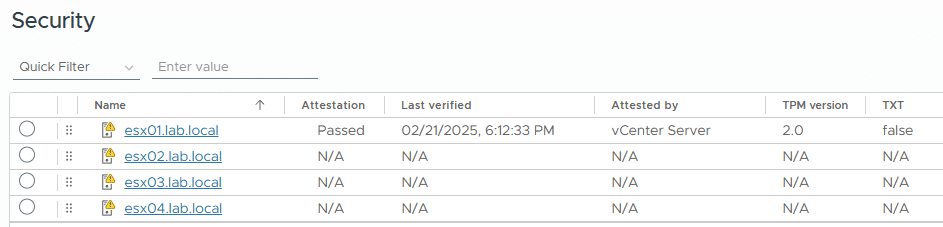
ESXi Host Attestation Status
If a TPM is present on an ESXi host, a Trusted Platform Module 2.0 compliant chip certifies the integrity of the platform. We can see the certification status of the host in the vSphere Client. In the picture below, one of the four hosts is equipped with a TPM chip.
Secure boot enforcement
To activate the TPM in the ESXi host firmware, we need to connect to the shell of the ESXi host using SSH. We query the current status with the ESXCLI command:
esxcli system settings encryption get

Mode: NONE
Require Executables Only From Installed VIBs: false
Require Secure Boot: false
Initially, the mode is still set to ‘NONE’. We change this with the following command:
esxcli system settings encryption set --mode=TPM
If we run the query again, we get the following status:
esxcli system settings encryption get

Mode: TPM
Require Executables Only From Installed VIBs: false
Require Secure Boot: false
Secure Boot can now be enforced.
esxcli system settings encryption set --require-secure-boot=T
Save settings
The configuration is now saved in the ESXi boot bank.
/bin/backup.sh 0
Display and save recovery keys
A secure ESXi configuration contains a recovery key. If we need to restore the secure ESXi configuration, we use a recovery key whose contents we enter as a CLI boot option. We can view the recovery key to export it and store it in a safe place.
esxcli system settings encryption recovery list

The key can be copied and stored securely in a text file. Each host has an individual recovery key. With several hosts, this can be time-consuming and confusing. Fortunately, there are PowerCLI scripts that query all hosts in the vCenter and export the recovery keys.
- Dell – How to gather the recovery keys for TPM security enabled VxRail nodes
- Steven Bright – Backing Up VMware ESXi TPM Encryption Recovery Keys
Creating a backup of the recovery key is an important part of managing a secure ESXi configuration. vCenter Server generates an alert to remind you to back up the recovery key.
Errors and troubleshooting
If a host shows a ‘Host TPM attestation alarm’, Secure Boot is probably not fully activated. This also happened to me with the first host. The reason was RTFM. KB369525 provides help on this.

Links
vSphere 8.0 – vSphere Security – Securing ESXi Hosts